FotoMagico offers up to 3 tracks for audio content. The three dedicated tracks are actually just a recommendation. If you want you may put any audio content in any track.
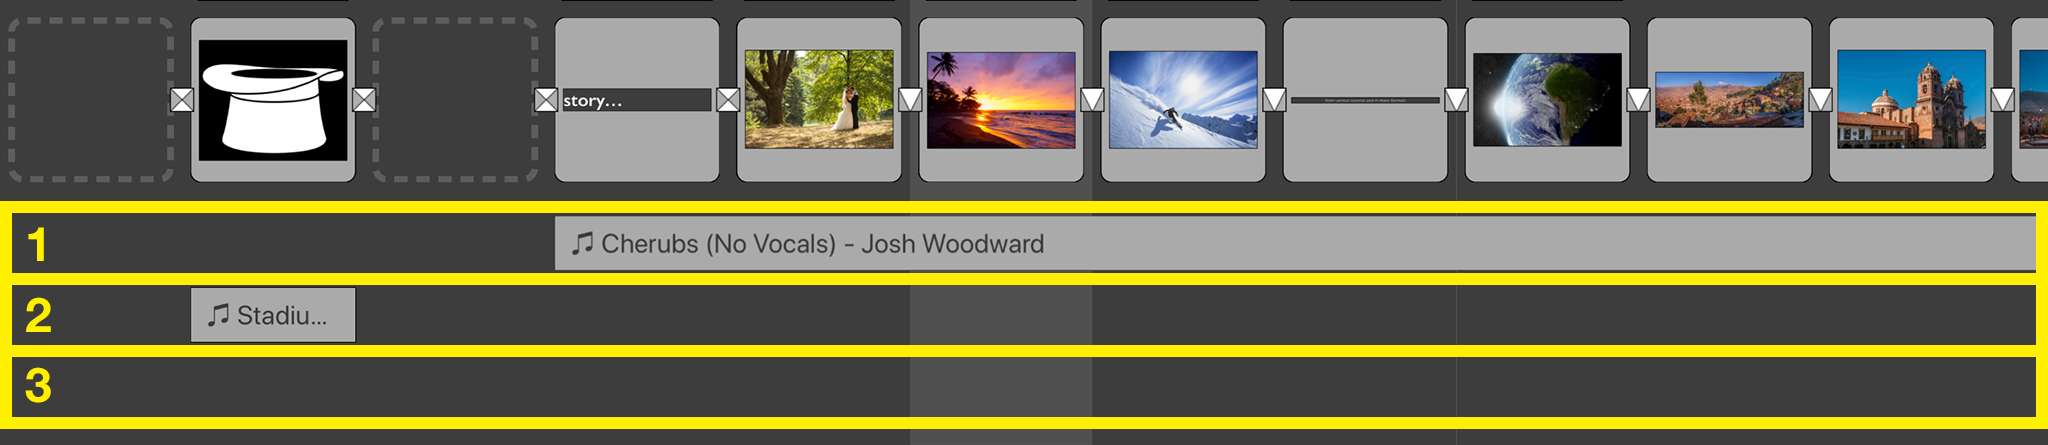
- 1 The Music track contains songs that set the mood.
- 2 The Ambience track contains sound effects, e.g. wind or rain.
- 3 The Narration track contains voiceovers.
Adding Audio
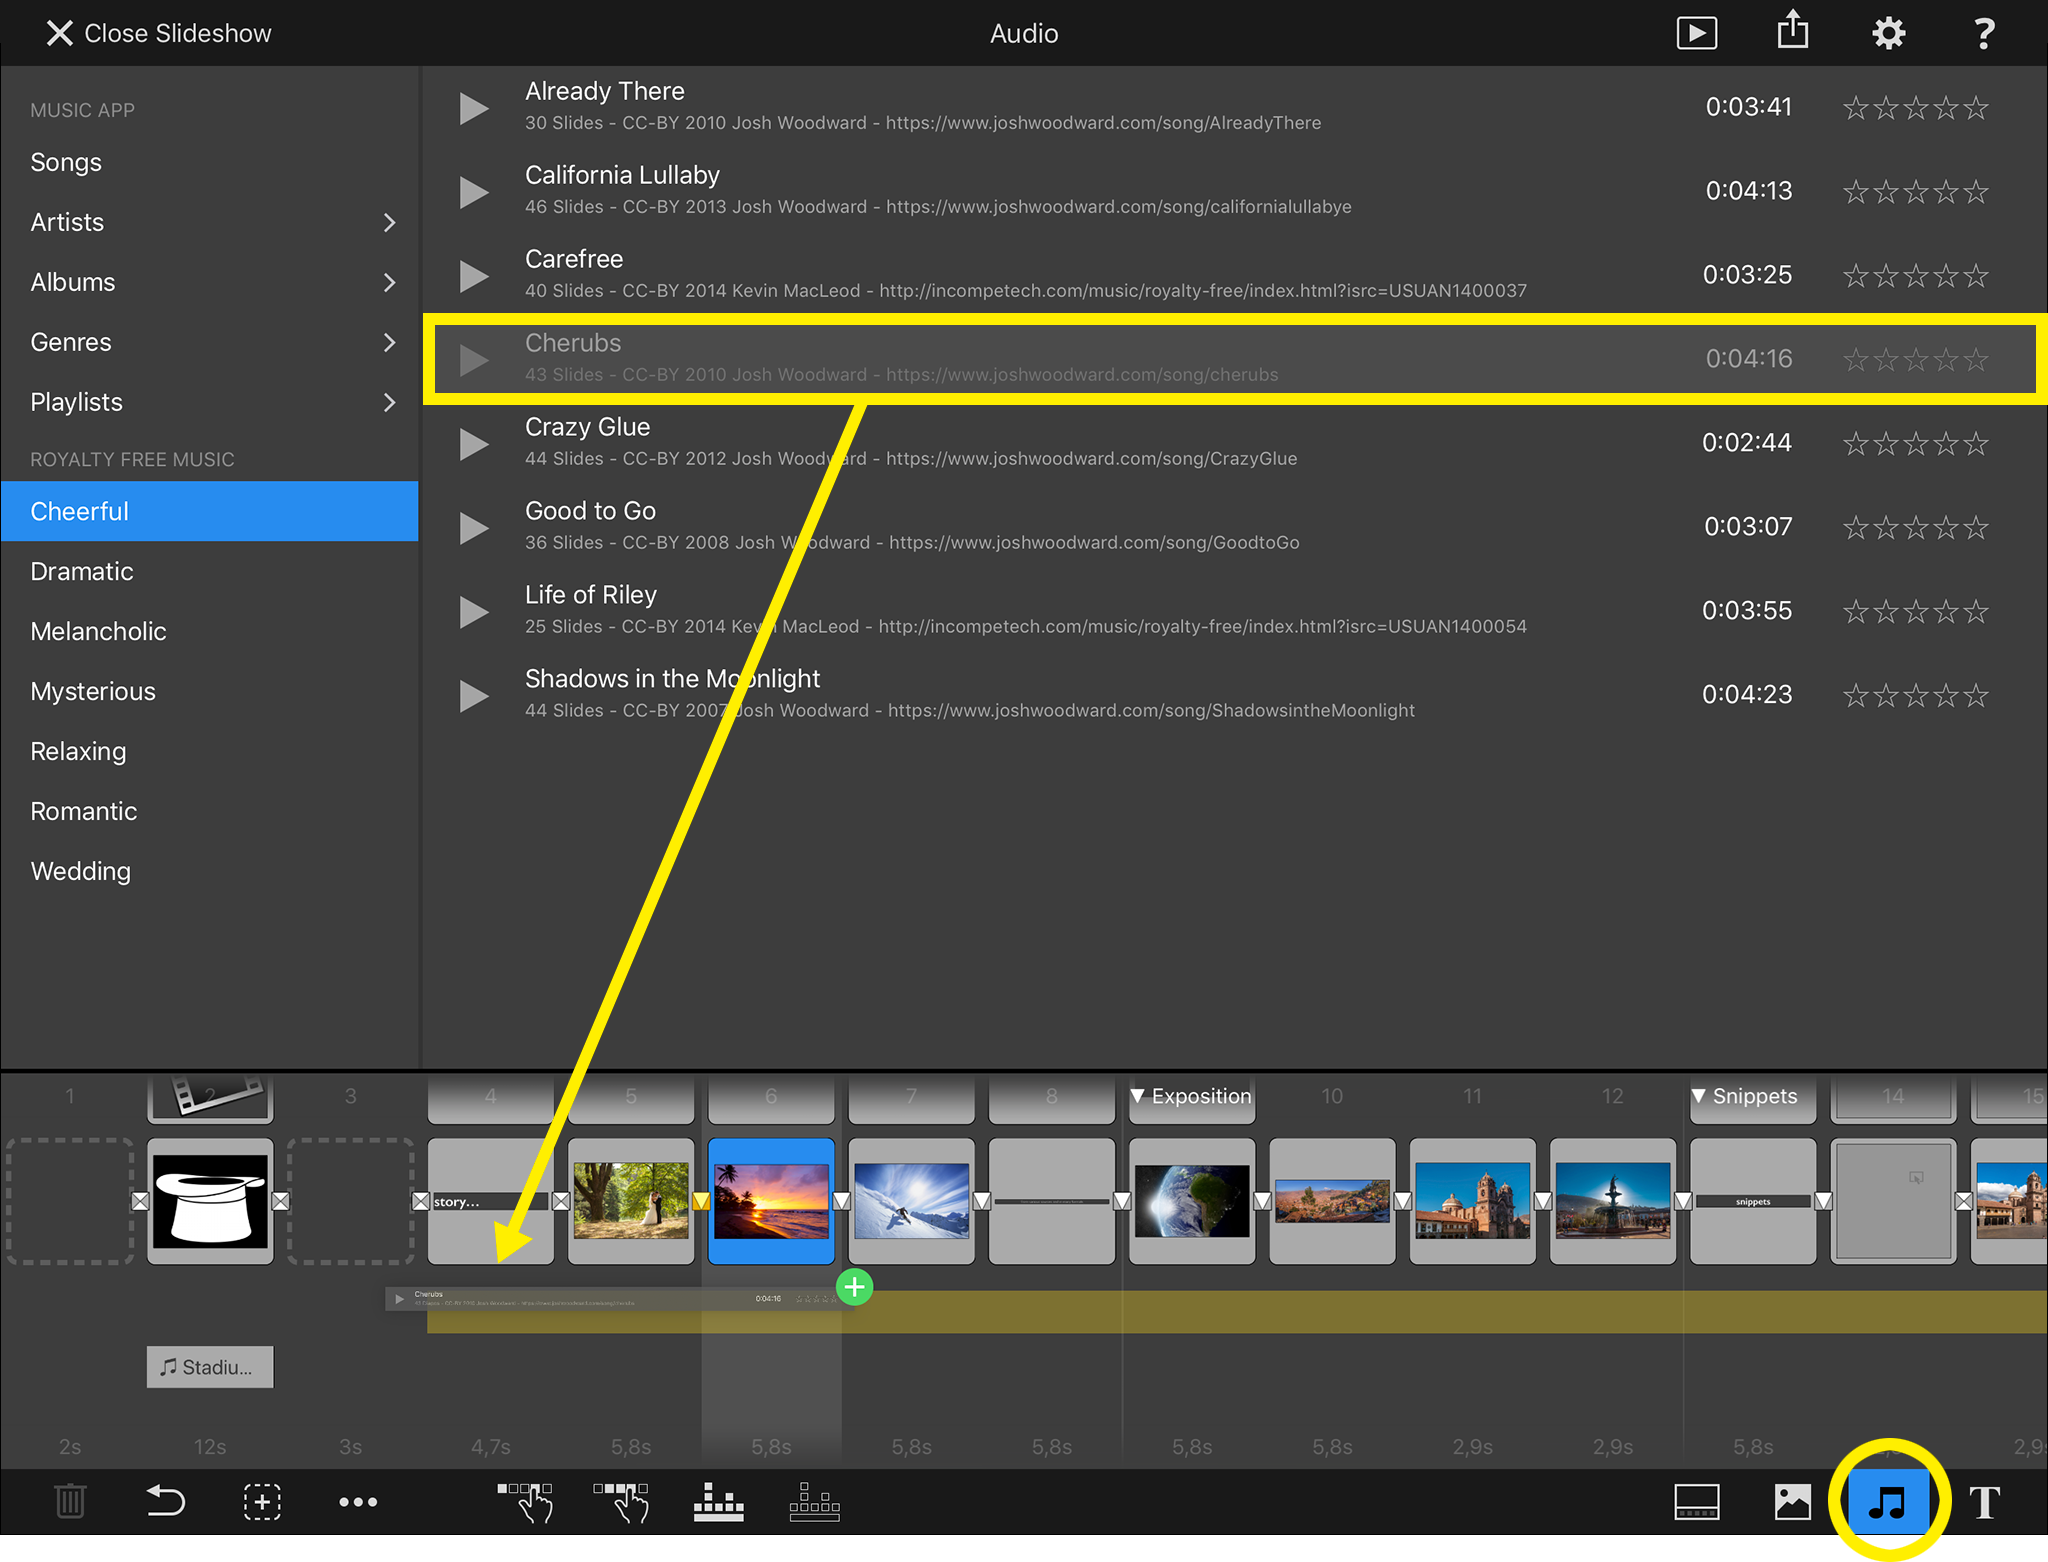
To add audio to your slideshow, switch to the Audio Browser and drag an audio track down to the Storyboard. A yellow highlight will indicate where the audio will be placed once dropped. To move an audio track to a different location, tap and hold it until it lifts slightly, then drag it to a new location in the Storyboard.
Adjusting Audio Length
Tap on an audio track to select it. It will turn blue and white resizing points will appear on the left and right ends. Drag the resizing point to adjust the length of an audio track, e.g. to reduce it from 40 to 10 slides.

Audio Options
Double-tap an audio track to show the Audio Options.
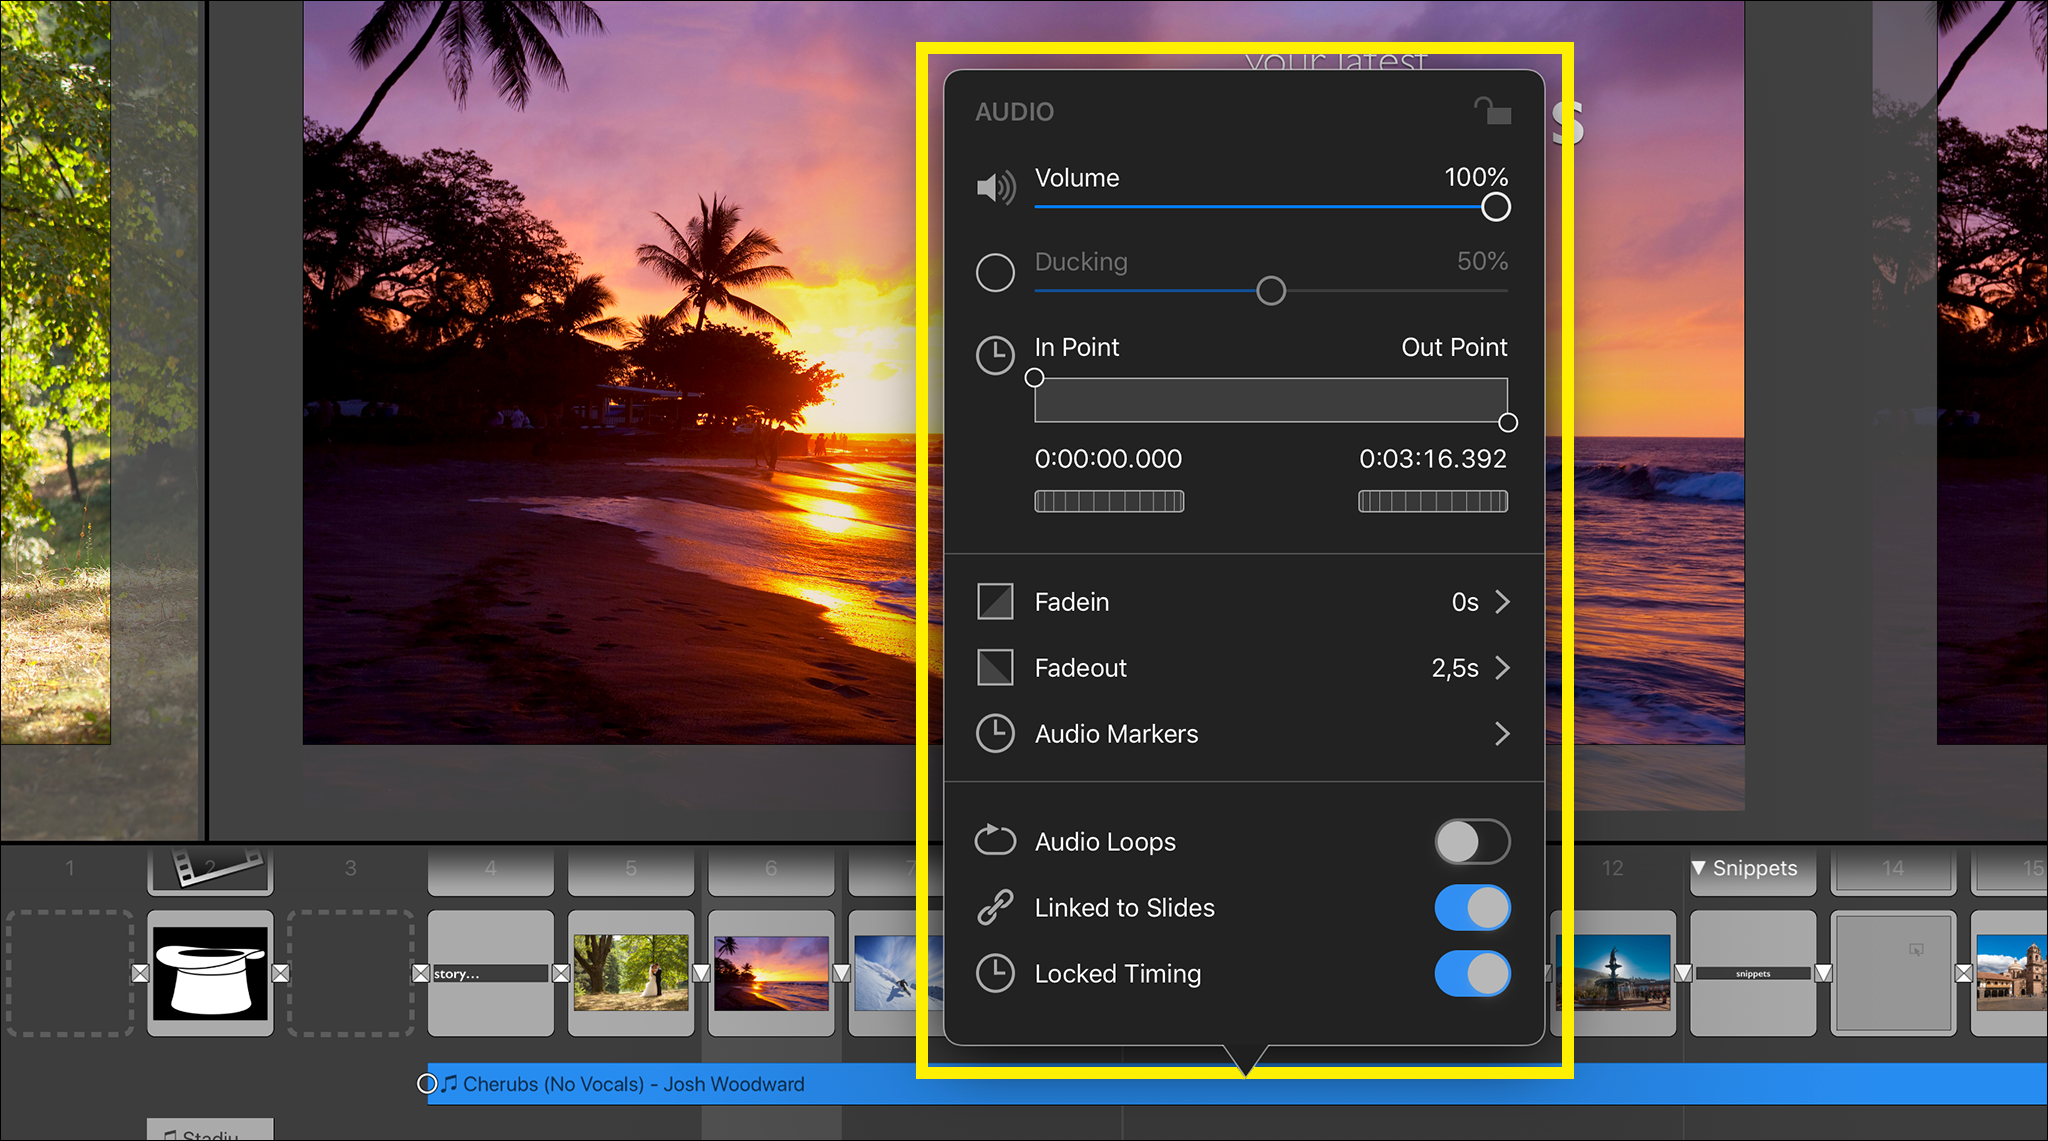
Use the Volume slider to adjust the loudness of the audio. Tap on the checkbox to the left of the Ducking slider to reduce the volume of other audio tracks while this audio track is playing.
Drag in the circles to adjust the In Point or Out Point of an audio track. This is useful to crop away unwanted parts of a song, e.g. the intro. You may also use the jog wheels or enter the timecode numerically to really fine-tune in and out points.
The Fadein and Fadeout of an audio track is usually automatic, i.e. directly linked to the transitions being used. However you disable automatic fades and choose manual offset and duration of audio fades.
Tap on Audio Markers to show the Audio Marker Assistant, which lets you add, edit and delete audio markers. Markers are needed to synchronize slides with the beat of the music.
Turn on Audio Loops if you need to repeat it (once or more often) in case an audio file is shorter than the sequence of slides this track is spanning.
If Linked to Slides is turned on, then this audio track always tries to stay below the same slides, even if slides are inserted or removed before or in the range of the audio track. If this option is turned off, then an audio track stays where it is when slides are being modified.
When Locked Timing is enabled, then jumping to a different slide during playback also jumps the audio. This is important for music that that synced to slides, or for recorded narration, but less so for ambience effects like wind or rain sounds. For this reason you can turn off this option for ambience effects.
Syncing Slides to Audio
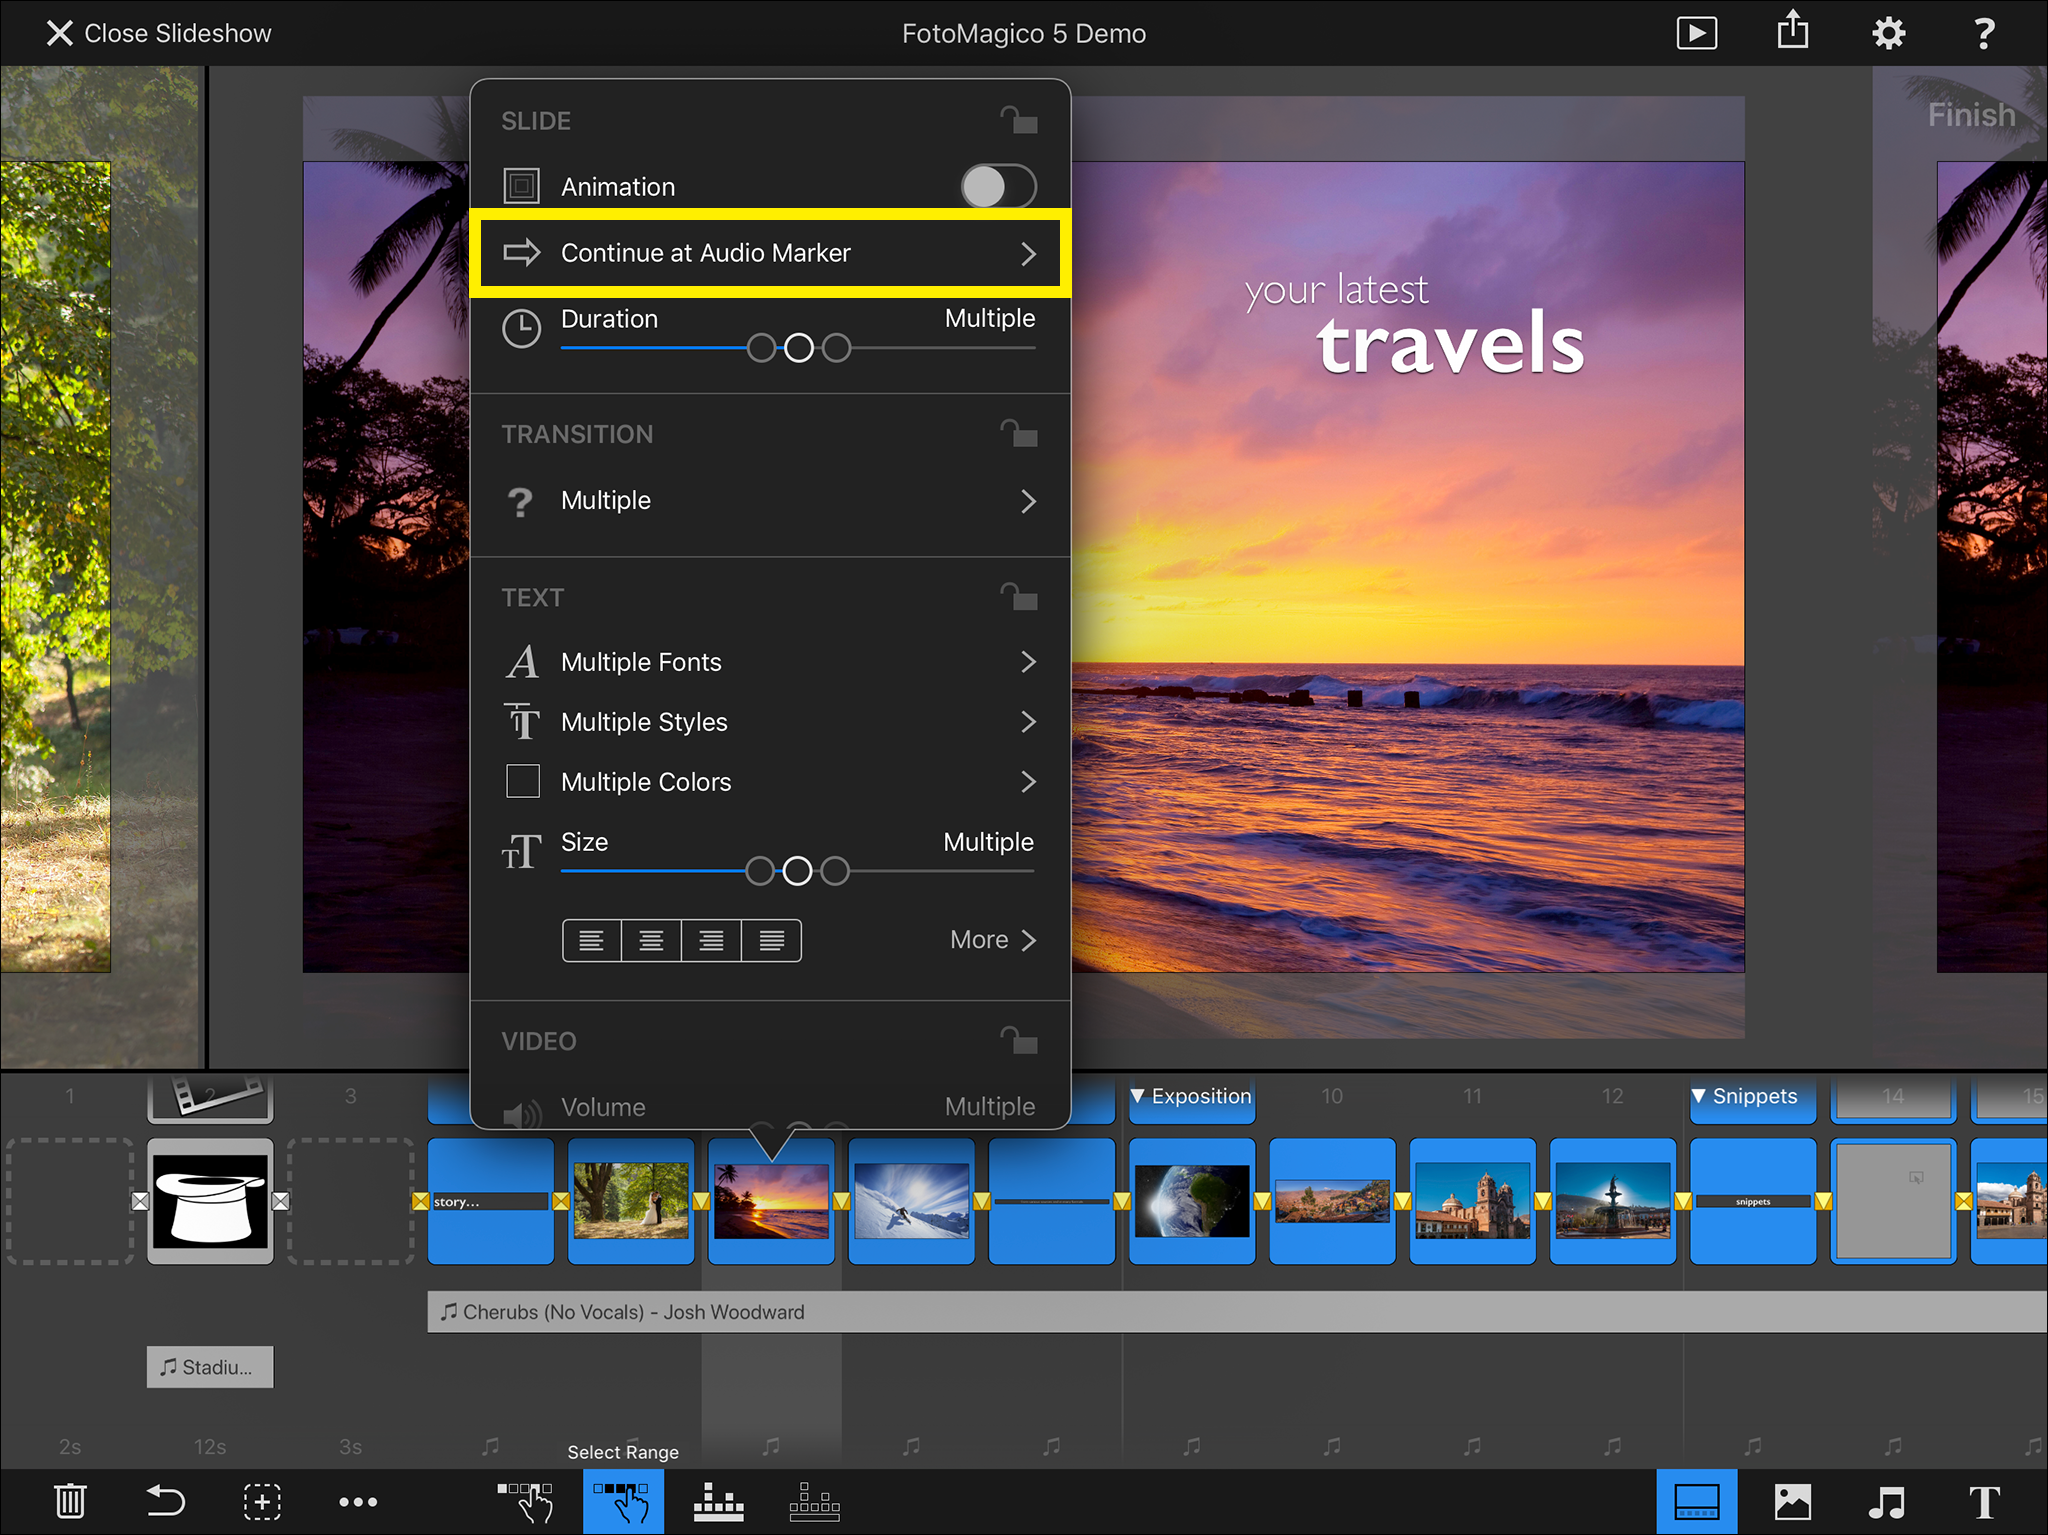
Slides are synced to audio with the help of Audio Markers. This requires two steps: First markers have to be added to an audio track. And second, the slides in question need to be switched to Continue at Audio Marker.
Double-tap an audio track to open the Options popup. Then tap on Audio Markers to show the Audio Marker Assistant. At the top you will see the audio waveform and playback buttons. You can scroll around the waveform. Use a two-finger pinch gesture to zoom into the waveform to reveal more detail. There are two different modes to create audio markers: Manual and Automatic.
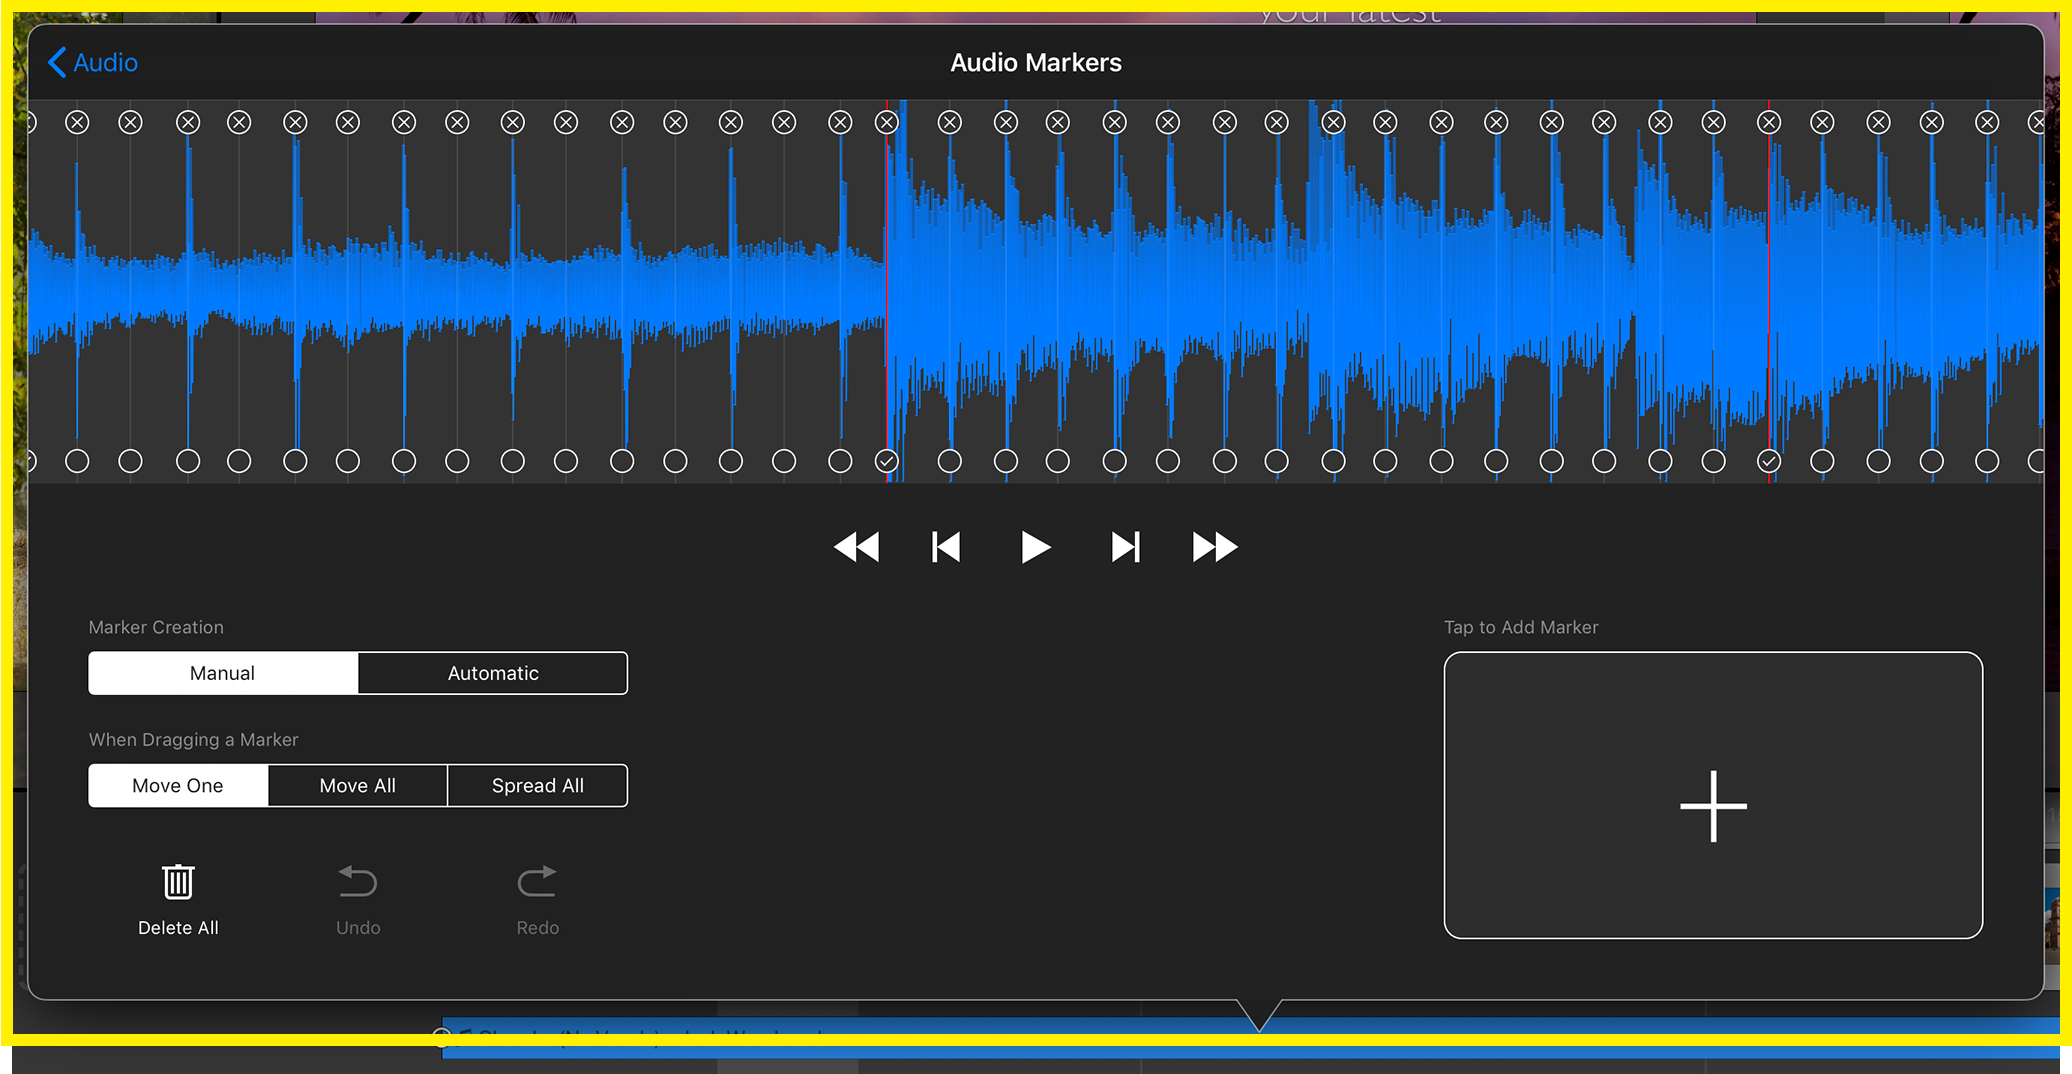
Manual Marker Creation
In manual mode you basically just play the audio and tap the big button on the right side with the beat of the music to add new markers. Play the audio again from the start to review the accuracy of the markers.
If a marker is slightly off, then simply move it to the correct location by dragging the bottom circle of a marker. Tap on ⊗ at the top of a marker to delete the marker.
Markers are only used during playback if they are active. Tap on the bottom circle of a marker to toggle its active state. This is useful if you have created a marker at every single beat, but only want to use one e.g. at every second bar. For a song with 4/4 meter this would be every 8th marker.
Moving Markers
If the position of a marker is slightly off, you can move it by dragging the bottom circle of the marker. The default behavior Move One is to just drag a single marker.
Once you select Move All, dragging one marker actually moves all markers simultaneously. This is useful if you did get the beat right, but the starting offset is not correct yet.
Spread All is used to spread the existing markers further apart or move them closer together. This requires two steps. First you select an anchor by long pressing the lower circle of a marker (for at least 1s). A diamond shape will appear above the circle to indicate that this marker is now the anchor – and will not be moved. Then you drag any other marker by its circle to move it. All markers between the anchor and the dragged one will be spread in an equidistant fashion. Please bear in mind that this will be more accurate, if the anchor and the dragged marker are far apart. This way you can quickly get pretty accurate markers for a steady music beat – this works well for pop and rock music, less so for classical music.

Automatic Marker Creation
Switch to Automatic if you know that a song has a steady beat (which is often the case for pop or rock music). Enter the BPM (beats per minute) value in the text field if you already know the tempo. Once you dismiss the keyboard markers will be automatically created. If the BPM value was not completely accurate, you can use the Spread All technique that was described above to fine tune your markers.
Activating Markers
If you have a marker for every beat in a song that is obviously way too fast for switching slides. For this reason you should only activate a marker every once in a while. You get the most pleasing effect, if you know the meter of the song (e.g. 4/4 or 3/4) and then select if you want an active marker at every bar, every 2 bars, or every 4 bars.
You can also manually activate or deactivate markers by tapping on the bottom circle of a marker. An active marker will have a checkmark and is displayed in red.
Syncing Slides
Once you have added audio markers to your audio track, all you have to do is select all slides above the audio track, open the the Options Popup, and select Continue at Audio Marker. The slide transitions are now perfectly synced to the music!